Introduction:

Power troubles can make or break a camping trip, and knowing how to connect solar panels to a camping battery is essential for staying prepared. I learned this the hard way during a disastrous expedition to the Cascade Mountains a few summers back. Picture this: me, completely off-grid, with a dead smartphone, a dying GPS, and no way to call for help or navigate back to my campsite. That nightmare experience was my baptism by fire into the world of portable solar power.
I remember sitting in my tent, shivering and frustrated, thinking there had to be a better way. Fast forward to today, and solar technology has become my most trusted camping companion. According to recent outdoor recreation surveys, over 67% of campers now use some form of portable solar charging – a statistic that would have been a lifesaver during my wilderness mishap.
My journey from a power-challenged camper to a solar charging enthusiast wasn’t smooth. I’ve fried more batteries than I care to admit, tangled with incompatible connectors, and spent countless hours researching the perfect portable power solution. But each mistake taught me something valuable about solar power systems.
What started as a survival necessity has become a passion. I’ve learned that connecting solar panels to a camping battery isn’t just about technology – it’s about freedom. It’s about extending your adventure, staying connected when it matters most, and embracing the incredible potential of portable power.
Understanding Solar Panel and Battery Compatibility

Let me tell you, connecting solar panels to a camping battery isn’t as complicated as it might seem – but it does require some critical know-how! Think of it like matching the right puzzle pieces together. Just as you wouldn’t try to force a piece that doesn’t fit, you can’t just connect any solar panel to any battery without considering their specific characteristics.
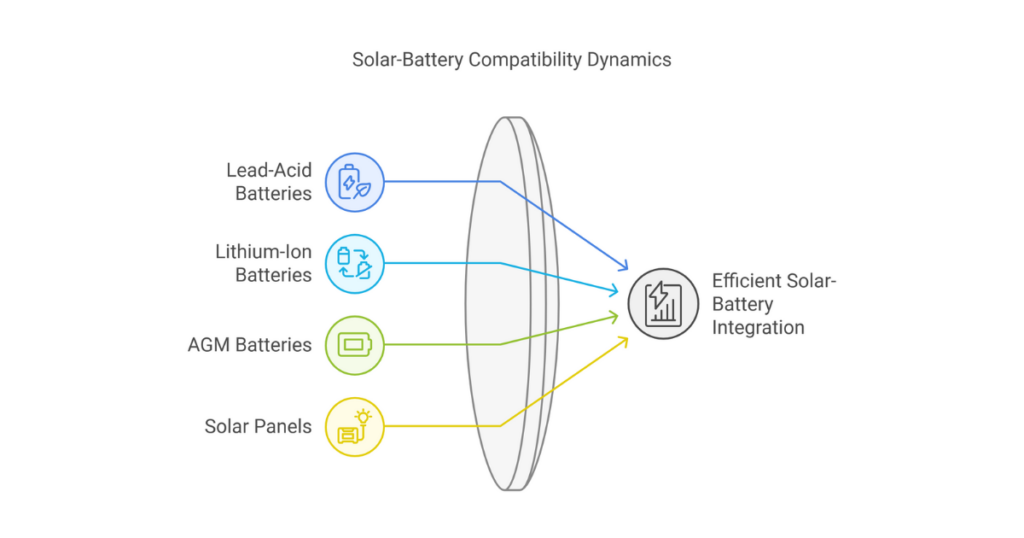
Let’s break down the compatibility puzzle. Camping batteries come in three primary types, each with its own personality:
- Lead-Acid Batteries: The old-school option. They’re typically cheaper but heavier and have a shorter lifespan. These batteries are less forgiving when it comes to charging and require more careful management.
- Lithium-Ion Batteries: The modern marvel of portable power. Lighter, more compact, and with a significantly longer lifespan. They can handle more charge cycles and are more efficient at storing and using energy. If you’re serious about camping power, these are often the go-to choice.
- AGM (Absorbent Glass Mat) Batteries: A middle ground between lead-acid and lithium-ion. They’re spill-proof, require less maintenance, and perform better in extreme temperatures.
The magic happens when you match your solar panel’s output precisely to your battery’s specifications. This isn’t just about plugging things together – it’s about understanding voltage and amperage. Your solar panel needs to provide the right amount of power to charge your battery without overloading or undercharging it.
Pro tip: Always check the voltage rating! A 12V solar panel typically works with a 12V battery, but the amperage (or current) is where things get tricky. You’ll want a solar panel that can provide enough current to charge your battery efficiently.
Essential Equipment for Solar Panel Connection

Gearing up for a solar-powered camping adventure is like preparing for a tech expedition into the wilderness. You’ll need the right tools to ensure a smooth, reliable power connection that keeps your devices humming and your adventure rolling.
Let’s talk solar panel types – because not all panels are created equal:
- Monocrystalline Panels: The high-performance athletes of the solar world. Made from a single crystal structure, these panels are incredibly efficient, especially in limited space. They’re typically more expensive but perform better in low-light conditions and are more compact – perfect for camping gear.
- Polycrystalline Panels: The budget-friendly option. Made from multiple crystal fragments, these panels are slightly less efficient but more affordable. They work well in bright, direct sunlight and are a solid choice for casual campers.
- Flexible Panels: The chameleons of solar technology. These can be mounted on curved surfaces, attached to backpacks, or draped over irregular shapes. They’re lightweight and incredibly versatile – a game-changer for hikers and minimalist campers.
But here’s the real MVP of your solar setup: the charge controller. Think of it as the traffic cop of your electrical system. It manages the flow of electricity from your solar panel to your battery, preventing overcharging, protecting against voltage spikes, and ensuring your battery stays healthy.
You’ll also need:
- High-quality, weather-resistant cables
- Appropriate connectors (MC4 connectors are standard in solar setups)
- A multimeter for testing connections and voltage
- Waterproof junction boxes
- Optional but recommended: a battery monitor to track your power levels
Preparation is key. Before your trip, test every connection, check your equipment, and understand how each piece works together. A little planning can mean the difference between a power-packed adventure and being left in the dark – literally!
Step-by-Step Solar Panel Connection Process
Let’s dive into the heart of solar power setup – the connection process. I’ll walk you through this like we’re preparing for an epic off-grid adventure, breaking down each step so even a complete beginner can feel confident.
Safety First: The Golden Rules of Solar Connection
Before you even think about connecting anything, let’s talk safety. Electricity isn’t something to mess around with, especially in the great outdoors. Always work in a dry, well-lit area, and if possible, have a buddy nearby. Pro campers know that preparation prevents problems!
Required Tools:
- Multimeter
- Wire strippers
- Screwdriver set
- Electrical tape
- Protective gloves
- Safety glasses
Pre-Connection Checklist:
- Verify battery voltage
- Check solar panel specifications
- Confirm charge controller compatibility
- Inspect all cables for damage
The Connection Sequence: Step by Painful Step
Step 1: Battery Preparation
Start by positioning your battery in a stable, well-ventilated area. If you’re using a lithium-ion battery, it should be mounted away from direct sunlight and extreme temperatures. Think of your battery like a temperamental camping buddy – it needs the right environment to perform its best.
Pro Tip: Always connect the charge controller to the battery FIRST. This might seem counterintuitive, but it prevents potential electrical surges that could fry your expensive equipment.
Step 2: Charge Controller Installation
The charge controller is your power management hero. It prevents overcharging and protects your battery from voltage fluctuations. Most controllers have clear markings:
- Battery terminals (usually labeled BAT or BATT)
- Solar panel terminals (typically marked PV or SOLAR)
Connect the battery terminals first:
- Red wire to positive (+) terminal
- Black wire to negative (-) terminal
Tighten connections firmly but don’t go Hulk mode – just snug enough to ensure good contact.
Step 3: Solar Panel Connection
Now for the exciting part! Connect your solar panel to the charge controller:
- Confirm polarity (most solar panels have MC4 connectors)
- Match positive to positive, negative to negative
- Use appropriate adapter cables if needed
Positioning Matters: Angle your solar panels directly towards the sun for maximum efficiency. A general rule of thumb is to aim for a 45-degree angle relative to direct sunlight. Think of it like positioning a satellite dish – precision is key!
Step 4: System Testing
Before celebrating, you’ll want to verify everything works:
- Use your multimeter to check voltage
- Confirm charge controller is receiving solar input
- Monitor battery charging status
Common Pitfalls to Avoid:
- Never connect panels in direct sunlight without a battery or load
- Avoid loose connections
- Keep connections clean and dry
- Use weatherproof junction boxes for outdoor setups
Troubleshooting Pro Tips:
- If no charging occurs, check:
- Cable connections
- Solar panel condition
- Charge controller settings
- Battery health
Imagine you’re deep in the wilderness, miles from the nearest outlet. Your solar setup is your lifeline – power for navigation, communication, and keeping those critical devices alive. One loose connection could mean the difference between a successful trip and a potential emergency.
Solar panels don’t work at 100% capacity all the time. Factors like temperature, panel angle, and atmospheric conditions impact performance. On a perfect day, you might get 70-80% of rated output.
Maintenance Tip: After each trip, inspect your connections. Look for any signs of wear, corrosion, or damage. A quick 5-minute check can prevent major headaches down the road.
The Learning Curve
Don’t get discouraged if it doesn’t work perfectly the first time. Every seasoned camper and solar enthusiast started exactly where you are now – figuring things out, making mistakes, and gradually becoming an expert.
Troubleshooting Common Solar Charging Issues

Listen up, fellow outdoor enthusiasts – solar power isn’t always as straightforward as the marketing makes it seem. In my years of camping and experimenting with portable power systems, I’ve encountered more solar charging headaches than I can count. But here’s the good news: most issues are totally fixable if you know what to look for!
Understanding Voltage Drops and Power Challenges
Imagine this scenario: You’re miles from civilization, your devices are running low, and suddenly your solar charging system decides to throw a tantrum. Frustrating, right? Voltage drops are the silent killers of off-grid power systems, and they can happen for multiple reasons.
Common Voltage Drop Culprits:
1. Loose Connections
Electrical connections are like relationships – they need constant attention and care. A single loose wire can completely interrupt your power flow. Here’s a pro tip: regularly inspect your connections, especially after bumpy rides or when moving your equipment.
Diagnostic Approach:
- Use a multimeter to check connection points
- Look for any green or white corrosion on terminals
- Ensure all screws and clamps are tight
- Check cable integrity for any visible damage
2. Cable Length and Resistance
Here’s a technical insight most campers don’t know: The longer your cables, the more electrical resistance you’ll encounter. It’s like trying to push water through a long, narrow pipe – you’ll lose pressure and efficiency.
Recommended Cable Practices:
- Use the shortest cable length possible
- Choose higher gauge (thicker) cables for longer distances
- Invest in high-quality, marine-grade cables designed for outdoor use
3. Battery Health and Age
Batteries are living, breathing systems – and they get tired just like we do. An aging battery might look fine on the surface but can dramatically reduce your solar charging efficiency.
Battery Health Checklist:
- Check battery voltage when fully charged
- Monitor charging and discharging cycles
- Replace batteries every 3-5 years for optimal performance
- Store batteries properly during off-seasons
4. Solar Panel Performance Limitations
Not all solar panels are created equal. Factors like temperature, shade, and panel angle dramatically impact their performance. On a scorching summer day, solar panels can actually become less efficient – who knew?
Performance Optimization Techniques:
- Clean panels regularly to remove dust and debris
- Angle panels directly towards the sun
- Use a solar tracker if possible
- Avoid partial shading which can reduce entire panel output
5. Charge Controller Issues
Your charge controller is the brain of the solar charging system. When it malfunctions, everything falls apart. Think of it like a traffic cop managing the flow of electricity.
Charge Controller Troubleshooting:
- Check LED indicator lights
- Verify correct voltage settings
- Ensure proper ventilation
- Update firmware if applicable
Real-World Troubleshooting Strategy
When something goes wrong, don’t panic. Follow this systematic approach:
- Check physical connections
- Test individual components
- Verify system settings
- Consult manufacturer documentation
- Consider professional diagnosis if all else fails
Pro Camping Hack: Always carry a backup power bank and know how to manually charge your critical devices. Technology is wonderful, but redundancy is wisdom.
Preventative Maintenance Tips
- Perform a full system check before each camping trip
- Keep connections clean and dry
- Store equipment properly during transportation
- Invest in quality components from reputable manufacturers
The Psychology of Solar Power Troubleshooting
Here’s something most guides won’t tell you: Troubleshooting is as much a mental game as a technical one. Stay calm, be methodical, and remember that every challenge is an opportunity to learn.
Common Mistakes to Avoid:
- Don’t force connections
- Avoid makeshift repairs in the field
- Never ignore warning signs
- Learn from each breakdown
When to Seek Professional Help
If you’ve tried everything and still can’t resolve the issue, it’s time to consult an expert. There’s no shame in admitting when a problem is beyond your current skill level.
A Final Word of Wisdom
Solar power systems are complex ecosystems. They require patience, understanding, and continuous learning. Each challenge you overcome makes you a more skilled outdoor enthusiast.
Remember: The goal isn’t perfect performance, but reliable power that keeps you connected and safe during your adventures. Stay curious, stay prepared, and keep exploring!
Conclusion:
As I reflect on my solar power journey, I can’t help but smile. What once seemed like an intimidating technical challenge has become second nature. Those early days of frustration have transformed into a sense of empowerment and adventure.
Solar power isn’t just about keeping your devices charged – it’s about breaking free from traditional limitations. It’s about turning remote campsites into personal power stations, about extending your connection with nature without losing touch with the world.
I remember my first successful solar setup – the pure joy of watching my phone charge while sitting next to a mountain stream, completely off the grid. It was more than just a technical achievement; it was a moment of personal triumph.
To all the aspiring outdoor tech enthusiasts out there, I say this: Don’t be intimidated. Every expert was once a beginner. Every solar setup starts with a single connection, a moment of curiosity, and the willingness to learn. Your wilderness adventures are about to get a whole lot more powerful.
So pack your gear, charge up those batteries, and embrace the freedom of portable solar power. The great outdoors is calling – and now, you’ll always be ready to answer.
Remember, it’s not about having the most expensive equipment. It’s about understanding your system, being prepared, and staying curious. Your next great adventure is just a solar connection away!
Frequently Asked Questions:
Q1: How Many Solar Panels Do I Need to Charge a Camping Battery?
The number of solar panels depends on your specific power needs and battery capacity. As a general rule of thumb, for a typical 100Ah camping battery, you’ll want a solar panel system that can generate between 200-300 watts. This typically means 1-2 solar panels rated at 100-150 watts each. Consider your power consumption – if you’re running multiple devices like smartphones, laptops, portable refrigerators, or GPS units, you might need additional panels. Pro tip: Always calculate your daily power consumption first, then size your solar setup accordingly.
Q2: Can I Use Solar Panels to Charge My Battery While Driving?
Absolutely! Many RV and overlanding enthusiasts use solar panels mounted on vehicle roofs to maintain battery charge during travel. However, there are some important considerations. Ensure your solar panels are securely mounted and use a charge controller designed for vehicle systems. The charging efficiency will depend on factors like panel angle, sunlight exposure, and your vehicle’s movement. While driving can provide some charging, it’s not as efficient as stationary solar charging. Consider supplementing with alternator charging or additional power sources for more reliable off-grid power.
Q3: How Long Will a Camping Battery Last When Charged by Solar Panels?
Battery longevity depends on several factors: battery type, capacity, your power consumption, and solar charging conditions. A typical lithium-ion battery charged by solar panels can last 2-5 years with proper maintenance. Daily usage patterns matter significantly. For example, a 100Ah battery might power a smartphone and LED lights for several days, while running a portable refrigerator will drain it much faster. Always follow manufacturer guidelines for charging and storage, and avoid completely depleting your battery – most experts recommend keeping it above 20% capacity to maximize its lifespan.
Q4: Are Portable Solar Panels Durable Enough for Rough Camping Conditions?
Modern portable solar panels are designed to withstand challenging outdoor environments. Look for panels with:
- Tempered glass surfaces
- Aluminum frame construction
- Water-resistant connections
- Flexible mounting options
Quality panels from reputable manufacturers can handle rain, moderate impacts, and temperature variations. However, they’re not indestructible. Avoid dropping them, protect from extreme impacts, and store carefully during transport. Flexible panels offer additional durability and versatility for adventurers who need lightweight, adaptable power solutions.
Q5: What’s the Biggest Mistake People Make When Setting Up Solar Charging Systems?
The most common mistake is neglecting proper system compatibility and not understanding individual component requirements. Many campers simply buy random solar panels and batteries without checking voltage, amperage, and charging specifications. This can lead to inefficient charging, damaged batteries, or complete system failure. Always:
- Match solar panel output to battery specifications
- Use an appropriate charge controller
- Understand your power consumption needs
- Invest in quality, compatible components
- Learn basic troubleshooting techniques
Remember, a well-researched, carefully planned solar charging system is an investment in your outdoor adventures. Take time to understand each component and how they work together.
