Introduction:
When I first started camping, my kitchen setup resembled a full-blown home kitchen transplanted into the wilderness—complete with multiple pots, pans, utensils, and gadgets that I rarely used but couldn’t bear to leave behind. After years of hauling unnecessary equipment up mountains and through forests, I’ve learned that when it comes to camp cooking, less truly is more.
In this post, I’ll share my journey to creating a minimalist camp kitchen that doesn’t sacrifice functionality or enjoyment. Whether you’re an ultralight backpacker counting every ounce or a car camper looking to simplify your setup, I hope my experience helps you create a more efficient outdoor cooking system.
Why Go Minimalist?
The turning point for me came during a three-day hiking trip in the Cascades. I packed what I thought was a “streamlined” kitchen, but by the second night, my shoulders were screaming from the weight. As I unpacked my cooking gear at camp, I realized I’d used less than half of what I brought.
Going minimalist isn’t just about reducing weight, though that’s certainly a benefit. It’s about creating an intentional system where every item serves a clear purpose and nothing is redundant. After that trip, I committed to rethinking my entire approach.
The Core Philosophy: Multipurpose Over Single-Use
The foundation of my minimalist camp kitchen setup is simple: every item should serve multiple functions. This philosophy has helped me cut my kitchen weight by over 60% while actually improving my cooking capabilities.
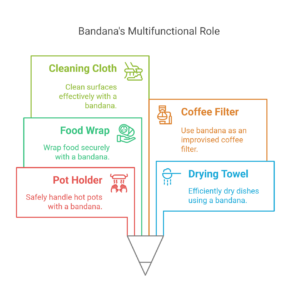
The classic example is the humble bandana. In my camp kitchen, a clean bandana serves as a:
- Pot holder
- Drying towel
- Food wrap
- Coffee filter in a pinch
- Cleaning cloth
This multi-functionality extends to every item in my kit. My titanium pot isn’t just for boiling water—it’s my cooking pot, eating bowl, measuring cup, and food storage container all in one.
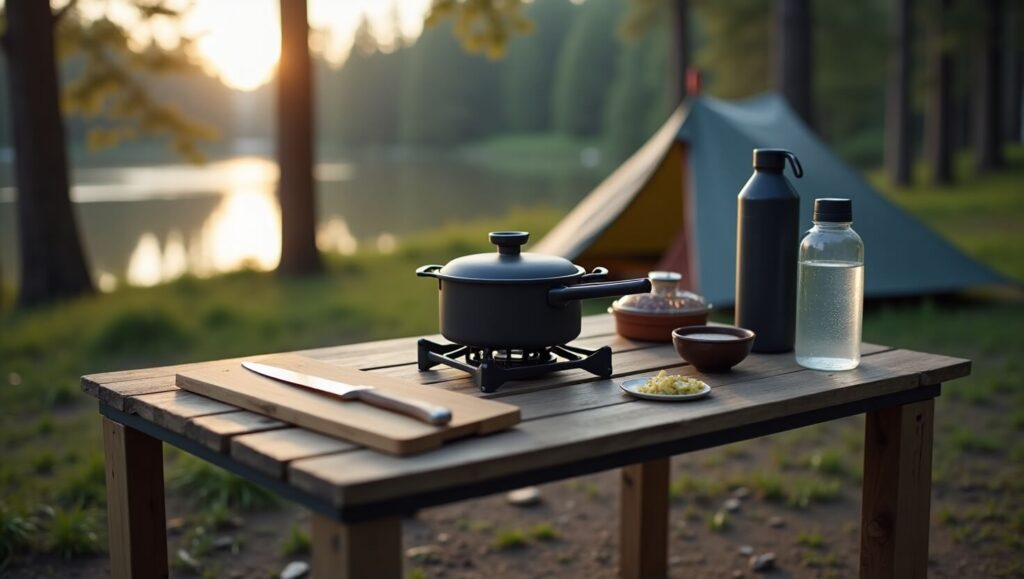
My Essential Minimalist Camp Kitchen Setup
After years of refinement, here’s my core kit for most 2-3 day trips:
| Item | Weight | Primary Uses | Notes |
|---|---|---|---|
| Titanium pot (750ml) | 3.9 oz | Cooking, eating, boiling | The heart of the system |
| Pocket rocket stove | 2.6 oz | Cooking, boiling | Small but mighty |
| Fuel canister | 7.8 oz (full) | Fuel source | 100g size for weekend trips |
| Titanium spork | 0.6 oz | Eating, cooking, and measuring | The ultimate multitool |
| Folding knife | 1.2 oz | Food prep, utility | 2.5″ blade is plenty |
| Silicone cup | 1.8 oz | Drinking, measuring | Collapsible to save space |
| Mini lighter | 0.5 oz | Fire starting | Plus waterproof matches as backup |
| Small sponge | 0.2 oz | Cleaning | Cut from a regular sponge |
| Biodegradable soap | 0.5 oz | Cleaning | In tiny dropper bottle |
| Seasoning kit | 1.0 oz | Flavoring | In mini containers |
| TOTAL | 20.1 oz | Just over 1.25 pounds! | |
This entire kit packs into the pot itself and takes up minimal space in my pack. For extended trips or when cooking for others, I might add a few items, but this core setup handles 90% of my camping needs.
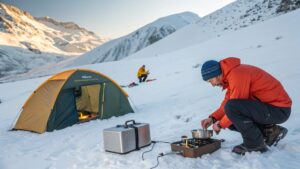
Stove Systems: Finding Your Perfect Match
The stove is the centerpiece of any camp kitchen, and choosing the right one depends entirely on your specific needs. After trying numerous options, I’ve settled on a few favorites for different scenarios.
Canister Stoves: My Go-To Option
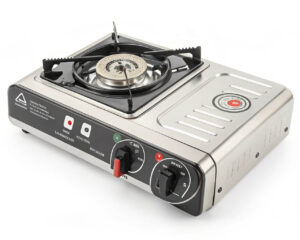 For most trips, I use a small canister stove like the MSR PocketRocket Deluxe. These stoves offer the perfect balance of weight, convenience, and cooking performance. They’re incredibly simple to use—just screw onto a fuel canister, turn the valve, and light.
What I love most about canister stoves is their adjustability. Unlike some ultralight options, I can simmer and cook real meals rather than just boiling water. This versatility makes the slight weight penalty worth it for me.
The downsides? Fuel canisters can be harder to find internationally, and they don’t perform as well in extremely cold conditions. I’ve learned this the hard way on winter camping trips when my stove struggled to maintain pressure.
Alcohol Stoves: The Ultralight Alternative
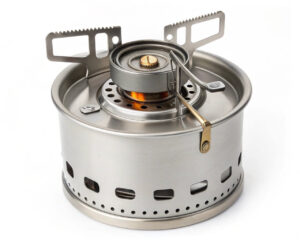 When I’m going ultralight or on longer trips where fuel weight becomes a concern, I switch to an alcohol stove. My personal favorite is the Trail Designs Caldera Cone system. It’s incredibly light (my setup is under 3 oz) and uses denatured alcohol, which is cheap and available virtually everywhere.
The beauty of alcohol stoves lies in their simplicity—no moving parts to break, no maintenance required. They’re perfect for simple cooking tasks like boiling water for freeze-dried meals or making coffee. The tradeoff is reduced control over temperature and longer cooking times.
Wood-Burning Stoves: Connecting with Tradition
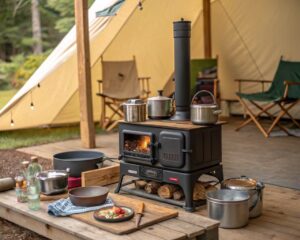 On solo trips when I want to slow down and connect with the camping experience, I sometimes bring my Solo Stove Lite. Using twigs and small sticks as fuel means I don’t have to carry fuel weight at all, which is a game-changer for longer treks.
There’s something deeply satisfying about cooking over a wood fire you’ve built yourself. It’s a skill that connects me to generations of outdoor enthusiasts before me. The downside, of course, is that gathering fuel and managing the fire takes more time and effort, not ideal when you’re tired or if it’s raining.
Food Planning for Minimalist Camping
A minimalist camp kitchen starts well before you leave home. Thoughtful meal planning reduces the equipment you’ll need and enhances your outdoor cooking experience.
One-Pot Wonders
I’ve become a master of one-pot meals. Simple doesn’t mean boring—some of my most memorable camp meals have been cooked in a single pot. A few favorites include:
- Breakfast: Quick-cooking oats with dried fruit, nuts, and a dollop of peanut butter
- Lunch: Couscous (rehydrates in minutes) with tuna packet and olive oil
- Dinner: Dehydrated beans, instant rice, and spices, topped with hard cheese
The key is to use ingredients with similar cooking times or that can be added sequentially to the same pot.
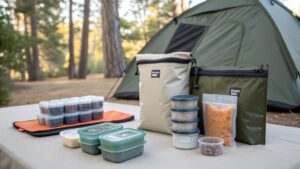
Pre-Trip Preparation
I’ve learned that a little pre-trip preparation goes a long way. Before heading out, I:
- Repackage food into ziplock bags to minimize waste and space
- Pre-mix spices for each meal
- Par-cook certain ingredients that take longer (like some grains)
- Measure out exact portions to avoid leftovers
This preparation not only saves space and weight but also makes cooking at camp much more straightforward.
Hydration Station
Water is essential for both drinking and cooking. I plan my campsites near water sources whenever possible and carry a Sawyer Squeeze filter for purification. This eliminates the need to carry excessive water weight.
For cooking, I’ve found that many dehydrated foods need a bit less water than package directions suggest. I’ve marked my cooking pot with approximate measurements, which helps conserve water and fuel.
Storage Solutions: Keeping It Organized
Organization is crucial to a minimalist kitchen. Without proper storage, even the most streamlined kit can become frustrating to use.
I use a combination of ziplock bags, small silicone containers, and Litesmith DCF pouches to keep everything in its place. My spice kit consists of mini containers originally designed for medication, all kept in a single small pouch.
For food storage, I’ve embraced the Ursack system when bear canisters aren’t required. It’s significantly lighter than hard-sided containers and protects my food from most wildlife.
Cleaning Up: Leave No Trace in Practice
A minimalist approach extends to cleaning as well. I follow strict Leave No Trace principles and have developed a simple system:
- Eat every last bit of food (no waste)
- Scrape the pot clean with my spork
- Use a small amount of biodegradable soap and water
- Dispose of gray water by scattering it broadly, at least 200 feet from water sources
I carry out all trash, no matter how small. This approach not only respects nature but simplifies the cleaning process.
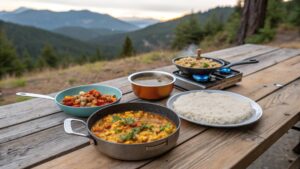
My Three Favorite Camp Recipes
Even with a minimalist setup, you can create delicious meals. Here are three of my go-to recipes that require minimal equipment:
Backcountry Breakfast Scramble
- 1/2 cup instant potatoes
- 1 packet powdered eggs
- 1 oz shelf-stable bacon or bacon bits
- 1 tablespoon olive oil
- Seasoning to taste
Add oil to the pot, heat, and add all ingredients with about 3/4 cup of water. Stir until combined and heated through. Simple, filling, and provides energy for the day ahead.
Midday Mediterranean Couscous
- 1/2 cup couscous
- 1 tablespoon olive oil
- 1 packet of tuna or salmon
- 1 tablespoon dried tomatoes
- 1 teaspoon Italian herbs
- Salt and pepper to taste
Add couscous to the pot, pour in just enough boiling water to cover. Cover the pot and let it sit 5 minutes. Fluff with a spork, add the remaining ingredients, and enjoy.
Evening Alpine Curry
- 1/2 cup instant rice
- 1 tablespoon curry powder
- 1 packet chicken or TVP (textured vegetable protein)
- 2 tablespoons coconut milk powder
- 1 tablespoon dried vegetables
- Salt to taste
Add rice and 1 cup of water to the pot, bring to a boil, reduce heat, and simmer 1 minute. Turn off the heat, cover, and let sit 5 minutes. Add remaining ingredients, stir, and let sit another minute to rehydrate vegetables.
Tools Worth Their Weight: My Non-Negotiables
While minimalism is the goal, certain items earn their place in my pack despite their weight. These are my non-negotiables:
Good Knife
A quality knife is irreplaceable. After trying various options, I’ve settled on the Opinel No. 6 for most trips. It’s light, affordable, and holds an edge well. The wooden handle also provides a nice tactile experience that plastic alternatives lack.
Titanium Cookware
Titanium may be more expensive than aluminum, but the weight savings and durability make it worthwhile for frequent campers. My TOAKS 750ml Pot has survived countless trips and shows no signs of wearing out.
Reliable Ignition
After once failing to start a fire with damp matches, I now carry redundant fire-starting methods. My primary is a mini BIC lighter, backed up by waterproof matches and a small ferrocerium rod. These take minimal space but provide peace of mind.
Weight vs. Comfort: Finding Your Balance
The beauty of a minimalist camp kitchen is that it’s customized to your needs. My kitchen has evolved significantly over time, and yours will too. The key is finding the right balance between weight savings and cooking enjoyment.
For weekend trips when weight isn’t critical, I might add a few luxury items like:
- A small cutting board
- Fresh ingredients for the first night
- A silicone spatula for easier cooking
- A dedicated coffee setup
For longer trips or challenging terrain, I’ll strip down to the absolute essentials and focus on simple, rehydrated meals.
Environmental Considerations
Minimalism aligns naturally with environmental ethics. By carrying less, we consume fewer resources and often leave a smaller footprint. I’ve made conscious choices to:
- Avoid single-use packaging when possible
- Choose durable equipment that won’t need frequent replacement
- Use biodegradable cleaning products
- Minimize fuel consumption through efficient cooking
These choices not only lighten my pack but also lighten my impact on the wilderness I love.
Budget Considerations: Minimalism Doesn’t Mean Expensive
While some ultralight gear comes with premium price tags, a minimalist camp kitchen doesn’t have to break the bank. Some of my favorite budget-friendly options include:
- BRS-3000T stove ($17): Incredibly light and surprisingly functional
- Stanco Grease Pot ($15): A budget alternative to titanium cookware
- DIY alcohol stove made from a cat food can (essentially free)
I’ve found that starting with affordable options helps me understand what features actually matter to me before investing in premium gear.
How My System Has Evolved
My camp kitchen has gone through multiple iterations over the years. Here’s how it’s evolved:
- Beginner Phase: Brought way too much, including a full cookset, multiple utensils, and even a cast iron pan for car camping
- Weight Conscious Phase: Drastically cut weight by switching to titanium and removing duplicates
- Ultralight Experiment: Tried going extremely minimal with just a pot and spork, but found it too restrictive
- Current Balanced Approach: Carefully selected multipurpose items that allow for enjoyable cooking without excess weight
This evolution taught me that the best system isn’t necessarily the lightest—it’s the one that best suits your cooking style and outdoor activities.
Special Considerations for Group Camping
While my solo setup is highly refined, cooking for groups presents different challenges. When camping with friends or family, I scale up by:
- Using a slightly larger pot (1.5-2 liters)
- Adding a collapsible bowl or two
- Bringing a small frying pan for more cooking options
- Including a lightweight cutting board
Even with these additions, the core philosophy remains—every item must earn its place through functionality and versatility.
Adapting to Different Environments
Different environments require adaptations to your kitchen setup. Through trial and error, I’ve developed specific adjustments for various conditions:
Desert Camping
Water conservation becomes critical in arid environments. I adapt by:
- Choosing meals that require minimal water for preparation and cleaning
- Carrying a dedicated water container separate from my drinking water
- Using the “bag cooking” method, where food rehydrates in its packaging
Winter Camping
Cold weather camping presents unique challenges for a minimalist kitchen:
- I switched to a liquid fuel stove like the MSR WhisperLite, which performs better in low temperatures
- I added a windscreen and heat reflector to improve efficiency
- I carry additional fuel, as consumption increases dramatically in cold weather
High Altitude
Above 10,000 feet, cooking changes significantly:
- Water boils at lower temperature, so cooking times increase
- I focus more on quick-cooking or pre-cooked foods
- I bring a lid for my pot to retain heat and conserve fuel
Digital Resources That Shaped My Approach
I’ve learned from many experts in the outdoor cooking space. These resources have been particularly valuable:
- Andrew Skurka’s blog offers practical advice on lightweight hiking and cooking
- The r/ultralight subreddit provides a community of like-minded minimalists
- BackpackingLight forums dive deep into gear optimization
These resources helped me avoid many mistakes and accelerated my learning curve considerably.
Conclusion:
My transition to a minimalist camp kitchen has been about more than just reducing weight. It’s taught me to be more intentional with my gear choices, more creative with my cooking, and more present during my outdoor experiences.
I’ve discovered that constraints often breed creativity—some of my most memorable camp meals have come from working with limited ingredients and equipment. There’s a special satisfaction in creating something delicious with just a pot, a spoon, and a handful of simple ingredients.
If you’re just starting to minimize your camp kitchen, remember that it’s a journey. Start with your next trip and leave behind one item you think you might not need. Gradually refine your system based on real experience rather than trying to overhaul everything at once.
The ultimate goal isn’t reaching some arbitrary weight target—it’s creating a system that enhances your outdoor experience rather than complicating it. For me, that means a camp kitchen that’s light enough to carry comfortably, versatile enough to cook enjoyable meals, and simple enough to let me focus on the wilderness around me rather than fussing with equipment.
What’s your experience with camp cooking? Are you a minimalist or do you prefer to bring the kitchen sink? I’d love to hear about your approach in the comments section!
Additional Resources
- The Ultimate Guide to Long-Term Camping Food Storage: Learn proven methods, essential gear, and expert strategies to keep your food fresh, safe, and accessible.
- The Ultimate Guide to Dutch Oven Cooking While Camping: Learn about off-grid camp cooking and recipes.
- Easy One-Pot Off-Grid Camping Meals for Outdoor Adventures: Learn my absolute favorite one-pot wonders that will fuel your wilderness adventures.
- Fireless Cooking Methods: Learn essential fireless cooking methods for remote camping
- Wilderness Cooking Techniques: Learn the best cooking techniques in the wilderness that will give you the best outdoor meal experience.
- How to Read Weather Patterns in the Wild: Learn about weather patterns and how to survive in the wilderness
- 10 Campfire Recipes That Won’t Bomb: Check out this curated list of campfire recipes that keep you going off-grid during camping
- Ultimate Guide to Wilderness Survival Skills: Talks comprehensively about survival skills in the wild or off-grid.
- How to Stay Safe While Camping Off-Grid: Offers safety and survival tips in the wilderness
Frequently Asked Questions
What’s the absolute minimum cooking setup I can get away with?
If you’re truly going ultralight, you can strip down to just a titanium pot (400-550ml), a spork, and a small alcohol stove. This setup weighs about 5-6 ounces total (not including fuel) and can handle basic water boiling and simple one-pot meals.
You’ll be limited to very basic cooking, but for short trips where weight is critical, this bare-bones approach works. Personally, I wouldn’t go below this threshold as it significantly impacts food enjoyment, which is an important part of my outdoor experience.
Won’t I get bored eating simple meals on longer trips?
This is a valid concern! I combat food fatigue on longer trips in several ways.
First, I vary textures and flavors with different spice blends that pack small but transform meals.
Second, I incorporate “treat” ingredients like small packets of olive oil, hot sauce, or shelf-stable cheese that add richness without much weight.
Finally, I plan progressive meals that get simpler as the trip continues, starting with more exciting meals featuring fresh ingredients on the first day.
Psychology matters too—I’ve found that physical hunger from a day of hiking makes even simple meals taste amazing in the wilderness.
How do you handle cleanup without running water?
Great question, as cleanup is often overlooked in camp kitchen planning! My system works like this: First, I plan meals that leave minimal residue (one-pot dishes that get fully consumed).
After eating, I scrape my pot thoroughly with my spork, then wipe it with a small piece of paper towel that I’ll pack out.
For actual washing, I use a dedicated “dirty water” bag and add just 1-2 ounces of water with a tiny drop of biodegradable soap. I swish this around, then scatter the gray water widely at least 200 feet from any water source.
For stubborn residue, a small cut of scrubby sponge works wonders while using minimal water.
What’s your advice for someone transitioning from car camping to backpacking?
Start by doing a “gear audit” after your next car camping trip. Take note of every kitchen item you actually used versus what sat untouched in your kit.
This honest assessment is eye-opening! Then, look for lightweight alternatives to your most-used items, prioritizing multi-purpose gear over single-use items. Don’t feel pressured to buy everything at once—quality lightweight gear is an investment.
Start with your cooking vessel and stove, as these offer the biggest weight savings. Practice cooking your backpacking menu at home first to identify any equipment gaps.
Finally, embrace the simplicity—backpacking meals don’t need to replicate home cooking to be satisfying!
How do you balance weight concerns with environmental impact?
This is something I think about constantly! The lightest option isn’t always the most environmentally sound (like single-use packaging). I’ve found a few effective compromises:
First, I use durable, long-lasting gear even if it weighs slightly more than disposable alternatives. Second, I repackage commercial backpacking meals into reusable bags when possible.
Third, I opt for biodegradable cleaning products and minimize their use. For fuel, I consider the full lifecycle—canister stoves are convenient but create waste, while alcohol stoves use renewable fuel but may be less efficient.
Wood stoves have zero fuel weight but require responsible foraging. Ultimately, I believe being present in nature motivates us to protect it, so the environmental impact of lightweight gear should be considered part of its overall “cost.”